| 일 | 월 | 화 | 수 | 목 | 금 | 토 |
|---|---|---|---|---|---|---|
| 1 | 2 | 3 | 4 | 5 | 6 | |
| 7 | 8 | 9 | 10 | 11 | 12 | 13 |
| 14 | 15 | 16 | 17 | 18 | 19 | 20 |
| 21 | 22 | 23 | 24 | 25 | 26 | 27 |
| 28 | 29 | 30 | 31 |
- app
- LLM
- 투자
- gemini
- FLUTTER
- 구글
- 설정
- AWS
- Windows
- JS
- Linux
- error
- 분석
- unity
- 재테크
- Ai
- 유니티
- docker
- JavaScript
- Python
- nodejs
- 주식
- MySQL
- 바보
- MSSQL
- API
- elasticsearch
- ChatGPT
- Kibana
- Today
- Total
가끔 보자, 하늘.
AWS SDK(cpp/c#/js) - Kinesis에 데이터 전송하고 Logstash로 받기 본문
이전에 SQS로 데이터를 보내는 방법을 기록해 보았는데, 이번에는 유사한 kinesis로 데이터를 보내는 과정을 살펴보겠습니다.
SQS는 Queue 서비스로 Application 통합, 분산 시스템 연계에 적합하며, Kinesis는 로그, 스트림 데이터 등의 실시간 분석, 전송 목적에 적합합니다.
Kinesis Data Streams 생성
데이터 스트림 중 Kinesis Data Streams를 선택 후 생성을 합니다. 저는 어플리케이션의 로그를 전송하고 추후 이를 logstash로 가져와 별도 구축된 Elasticsearch에 저장하기 위해 사용하기 때문에 Kinesis Data Streams를 사용합니다.

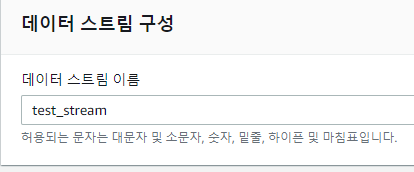
생성할 스트림 이름은 "test_stream"으로 명명합니다.

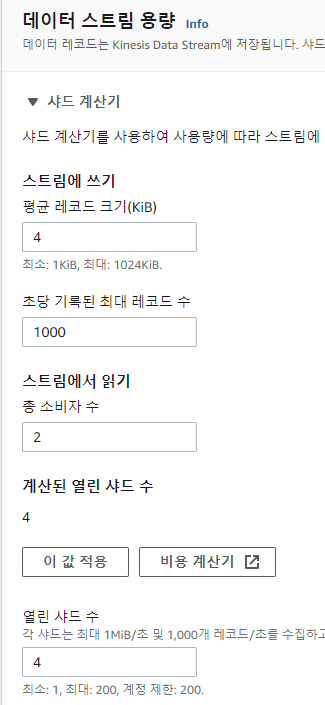
데이터 스트림 용량을 설정할 때 샤드 수를 얼마로 해야할지 모르겠다면 샤드 계산기를 통해 자신이 전송하고자 하는 데이터 추측치를 기록하여 필요한 샤드 수를 예측할 수 있습니다.

한 개의 샤드는 초당 1MB 또는 초당 레코드 1000개의 수집 용량과 초당 2MB의 출력 용량을 제공합니다.
한번에 전송할 데이터 크기가 4KB이며, 초당 전송할 최대 래코드 수가 1000개라고 가정하고, 스트림에서 읽기(저의 경우는 logstash가 kinesis로 접근해서 데이터를 읽어올 예정이며, thread는 2개를 사용한다고 가정해보니 총 4개의 샤드가 필요하다는 예측값을 얻을 수 있었습니다.

생성이 완료되면 위와 같은 결과를 확인할 수 있습니다. 데이터 보존 기간은 "구성" 탭에서 "데이터 보존" 항목에서 편집할 수 있으며 7일 보존할 경우 약 70% 정도의 요금이 추가됩니다. 기본값은 1일입니다.
데이터 전송 샘플 코드
C++/샘플 코드의 원본은 이 곳을 참고하시기 바랍니다. 아래 예제에서는 kinesis put 권한만을 가진 IAM 사용자를 사용하고 싶을 때, 해당 사용자의 인증 정보를 설정하여 데이터를 전송하도록 수정된 샘플 코드입니다.
/*
Copyright 2010-2019 Amazon.com, Inc. or its affiliates. All Rights Reserved.

This file is licensed under the Apache License, Version 2.0 (the "License").
You may not use this file except in compliance with the License. A copy of
the License is located at

http://aws.amazon.com/apache2.0/

This file is distributed on an "AS IS" BASIS, WITHOUT WARRANTIES OR
CONDITIONS OF ANY KIND, either express or implied. See the License for the
specific language governing permissions and limitations under the License.
*/

#include <iostream>
#include <ctime>
#include <iomanip>
#include <random>
#include <aws/core/Aws.h>
#include <aws/core/utils/Outcome.h>
#include <aws/core/auth/AWSCredentialsProvider.h>
#include <aws/kinesis/KinesisClient.h>
#include <aws/kinesis/model/DescribeStreamRequest.h>
#include <aws/kinesis/model/DescribeStreamResult.h>
#include <aws/kinesis/model/GetRecordsRequest.h>
#include <aws/kinesis/model/GetRecordsResult.h>
#include <aws/kinesis/model/GetShardIteratorRequest.h>
#include <aws/kinesis/model/GetShardIteratorResult.h>
#include <aws/kinesis/model/Shard.h>
#include <aws/kinesis/model/PutRecordsResult.h>
#include <aws/kinesis/model/PutRecordsRequest.h>
#include <aws/kinesis/model/PutRecordsRequestEntry.h>

int main()
{
	Aws::SDKOptions options;
	Aws::InitAPI(options);
	// set user access key id and secret key here
	Aws::Auth::AWSCredentials credentials(Aws::String("access_key_id"), Aws::String("secret_key"));

	{
		//set kinesis data steams name
		const Aws::String streamName("test_stream");

		std::random_device rd;
		std::mt19937 mt_rand(rd());

		Aws::Client::ClientConfiguration clientConfig;
		// set your region
		clientConfig.region = Aws::Region::US_EAST_1;
		Aws::Kinesis::KinesisClient kinesisClient(credentials, clientConfig);

		Aws::Kinesis::Model::PutRecordsRequest putRecordsRequest;
		putRecordsRequest.SetStreamName(streamName);
		Aws::Vector<Aws::Kinesis::Model::PutRecordsRequestEntry> putRecordsRequestEntryList;

		// send json format data to kinesis
		{
			Aws::Kinesis::Model::PutRecordsRequestEntry putRecordsRequestEntry;
			Aws::StringStream pk;
			pk << "pk-" << (i % 100);
			putRecordsRequestEntry.SetPartitionKey(pk.str());
			Aws::StringStream data;

			auto t = std::time(nullptr);
			struct tm timeinfo;
			localtime_s(&timeinfo, &t);

			data << "{\"Code\":1000, \"time\": \"" << std::put_time(&timeinfo, "%Y-%m-%d %H:%M:%S") << "\"}";
			std::cout << data.str();
			Aws::Utils::ByteBuffer bytes((unsigned char*)data.str().c_str(), data.str().length());
			putRecordsRequestEntry.SetData(bytes);
			putRecordsRequestEntryList.emplace_back(putRecordsRequestEntry);
		}
		putRecordsRequest.SetRecords(putRecordsRequestEntryList);
		Aws::Kinesis::Model::PutRecordsOutcome putRecordsResult = kinesisClient.PutRecords(putRecordsRequest);

		// if one or more records were not put, retry them
		while (putRecordsResult.GetResult().GetFailedRecordCount() > 0)
		{
			std::cout << "Some records failed, retrying" << std::endl;
			Aws::Vector<Aws::Kinesis::Model::PutRecordsRequestEntry> failedRecordsList;
			Aws::Vector<Aws::Kinesis::Model::PutRecordsResultEntry> putRecordsResultEntryList = putRecordsResult.GetResult().GetRecords();
			for (unsigned int i = 0; i < putRecordsResultEntryList.size(); i++)
			{
				Aws::Kinesis::Model::PutRecordsRequestEntry putRecordRequestEntry = putRecordsRequestEntryList[i];
				Aws::Kinesis::Model::PutRecordsResultEntry putRecordsResultEntry = putRecordsResultEntryList[i];
				if (putRecordsResultEntry.GetErrorCode().length() > 0)
					failedRecordsList.emplace_back(putRecordRequestEntry);
			}
			putRecordsRequestEntryList = failedRecordsList;
			putRecordsRequest.SetRecords(putRecordsRequestEntryList);
			putRecordsResult = kinesisClient.PutRecords(putRecordsRequest);
		}
	}
	Aws::ShutdownAPI(options);

	return 0;
}
c# .NET /샘플 코드의 원본은 이 곳을 참고하시기 바랍니다. 아래 예제에는 위와 마찬가지로 kinesis put 권한만을 가진 IAM 사용자를 사용하고 싶을 때, 해당 사용자의 인증 정보를 설정하여 데이터를 전송하도록 수정되었습니다.
using System;
using System.Collections.Generic;
using System.IO;
using System.Text;
using System.Threading;
using Amazon.Kinesis;
using Amazon.Kinesis.Model;
using Newtonsoft.Json;

namespace KinesisPublishSample
{
    public class LogSampleData
    {
        public string time { get; set; }
        public int code { get; set; }
    }

    class Program
    {
        // NOTE: replace the value with your Kinesis stream name
        static string _kinesisStreamName = "test_stream";

        // NOTE: update with the region in which you created your stream
        static Amazon.RegionEndpoint _regionEndpoint = Amazon.RegionEndpoint.USEast1;

        static int _maxExecutionCount = 1000;
        static int _publishInterval = 3000;

        static bool _cancelled = false;

        static void Main(string[] args)
        {
            Console.CancelKeyPress += new ConsoleCancelEventHandler(Console_CancelKeyPress);

            //  it will push log data maximum 2x1000 count
            for(int ec=0; ec< _maxExecutionCount; ec++)
            {
                //  add log data in a list or queue
                List<LogSampleData> dataList = GetLogDataList(2);
                //  push log data
                PublishDeviceDataToKinesis(dataList);
                //  wait for 3 sec
                Thread.Sleep(_publishInterval);

                //  will you stop?
                if (_cancelled) break;
            }

            Console.WriteLine("Task Completed!\n");
            Console.Write("To publish more data, please run the application again.\n");

            Console.CancelKeyPress -= new ConsoleCancelEventHandler(Console_CancelKeyPress);
        }

        private static void Console_CancelKeyPress(object sender, ConsoleCancelEventArgs e)
        {
            if (e.SpecialKey == ConsoleSpecialKey.ControlC)
            {
                _cancelled = true;
                e.Cancel = true;
            }
        }

        private static void PublishDeviceDataToKinesis(List<LogSampleData> dataList)
        {
            var aws_cred = new Amazon.Runtime.BasicAWSCredentials("access_key_id", "secret_key");
            var kinesisClient = new AmazonKinesisClient(aws_cred, _regionEndpoint);

            foreach (LogSampleData data in dataList)
            {
                var dataAsJson = JsonConvert.SerializeObject(data);
                var dataAsBytes = Encoding.UTF8.GetBytes(dataAsJson);
                using (var memoryStream = new MemoryStream(dataAsBytes))
                {
                    try
                    {
                        var requestRecord = new PutRecordRequest
                        {
                            StreamName = _kinesisStreamName,
                            PartitionKey = data.time,
                            Data = memoryStream
                        };

                        var responseRecord = kinesisClient.PutRecordAsync(requestRecord).Result;
                        Console.WriteLine($"Successfully published. Record:{data.log_code},{data.title_code},{data.time} Seq:{responseRecord.SequenceNumber}");

                    }
                    catch (Exception ex)
                    {
                        Console.WriteLine($"Failed to publish. Exception: {ex.Message}");
                    }
                }
            }
        }

        private static List<LogSampleData> GetLogDataList(int _sampleLogCount)
        {
            var dataList = new List<LogSampleData>();

            var url = Path.GetRandomFileName();
            for (var i = 0; i < _sampleLogCount; i++)
            {
                var rnd = new Random(Guid.NewGuid().GetHashCode());

                var data = new LogSampleData
                {
                    time = System.DateTime.Now.ToString("yyyy-MM-dd HH:mm:ss"),
                    code = 1000,
                };
                dataList.Add(data);
            }
            return dataList;
        }
    }
}
Nodejs /샘플 코드의 원본은 이 곳을 참고하시기 바랍니다. 내용은 위와 동일합니다.
'use strict';

const AWS = require('aws-sdk');
const env = {
    AWS: {
        region: 'us-east-1',
        accessKeyId: "access_key_id",
        secretAccessKey:"secret_key"
    },
    kinesis: {
        apiVersion: '2013-12-02'
    }
};

// AWS Configuration
AWS.config.update(env.AWS);
AWS.config.credentials.get(function(err) {
    // attach event listener
    if (err) {
        alert('Error retrieving credentials.');
        console.error(err);
        return;
    }
    // create Amazon Kinesis service object
    var kinesis = new AWS.Kinesis(env.kinesis);
    let timerId = setInterval(() => {
        var records = [];
        var record = {
            Data : JSON.stringify({
                "code" : 1000,
                "time" : new Date(),
            }),
            PartitionKey: 'partition-value'
        };
        records.push(record);

		kinesis.putRecords({
            Records: records,
            StreamName: 'test_stream'
        }, function(err, data) {
            if (err) {
                console.error(err);
            }else{
                console.log("recorded shardId = ",data.Records[0].ShardId, count++);
            }
        });
    }, 3000);
});
Logstash로 Kinesis에 저장된 데이터 가져오기
logstash 세팅하는 방법은 이 링크를 확인하세요.
리눅스도 기본 설치 절차만 다를 뿐 설정 방법은 동일합니다.
'개발 이야기 > 개발 및 서비스' 카테고리의 다른 글
| elasticsearch-js로 인데스가 존재하는지 확인하는 방법 (0) | 2021.05.18 |
|---|---|
| Nodejs 로 현재 환율 정보 확인 코드 만들기 (0) | 2021.04.06 |
| 최적화 관련 몇 가지 (0) | 2020.07.09 |
| Windows 서버에서 프로세스 관리하기 (1) | 2020.07.09 |
| React Native로 앱 개발 - 02. UI 적용 (0) | 2020.02.23 |


